Written by Rod Wing
For those of you who have had to do a lot of coordinate entry in MicroStation, either through the key-in browser or using AccuDraw, you know what a chore that can be. You can use Excel and Notepad to create a MicroStation script file to make that job much easier.
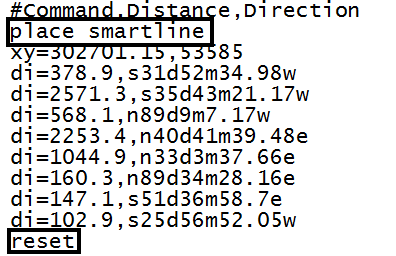
In this example we have a parcel boundary from a legal description. We are given the start point Northing, Easting and the Distance and Bearing for each subsequent point. Even if you do not receive the coordinate entries in electronic format and have to re-key all of the values you may find this method easier than trying to key them directly in MicroStation.
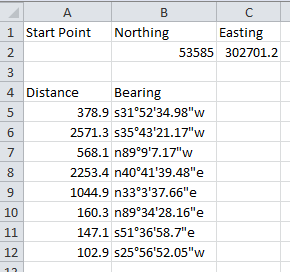
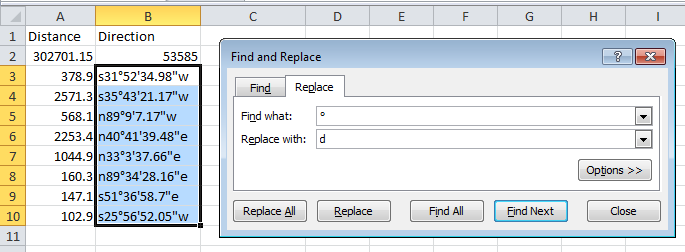
The first step is to format the coordinate data. The Northing (Y) and Easting (X) values have been transposed to the be in the traditional X,Y order. Then the direction/bearing values are edited so they are in a format MicroStation accepts. Simply use the Excel Replace tool to edit all the values at once.
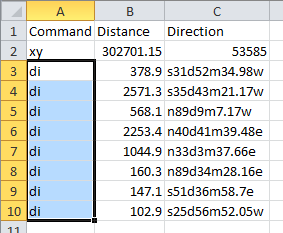
The next step is to insert a column at the beginning of each line for the MicroStation key-in command. In this case the first coordinate will use the MicroStation XY= key-in to place the point while the subsequent points will use the MicroStation DI= key-in to use the distance and direction values. Adding the command column in Excel it is easy to copy and paste the command key-ins.
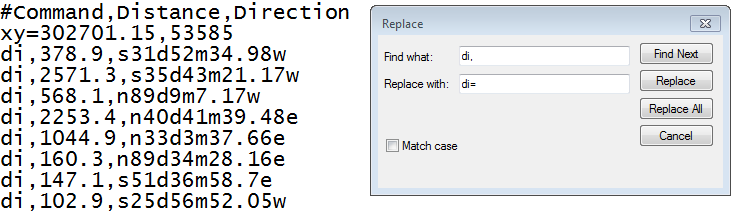
Once this formatting is completed in Excel we export the data to a .csv file. Using Notepad we can complete the formatting. The first step is to comment out any non-executable lines by placing a # at the beginning. Then we replace the first comma with an = so that it matches the MicroStation key-in syntax. Using the Notepad Replace tool makes this very easy.
Now that coordinate key-ins are formatted correctly we add the MicroStation tool command(s) with which we want to place the coordinates. In this case we start with the Place Smartline tool and enter a Reset when completed.
Finally, save the text file and open MicroStation. In MicroStation we open the Key-in browser and run the script file. The @ character followed by the full path to the script file will execute commands in the file.

Last month’s tips:
 MicroStation: Key InRoads: Horizontal AutoCAD Civil 3D: VBA: Message Box
Point Snap Geometry working … Improve Performance… Buttons
Don’t want to miss out on other great information? Subscribe to this blog or our monthly eNewsletter now!
Learn More ◊ Contact us today ◊ Newsletter ◊
MicroStation: Key InRoads: Horizontal AutoCAD Civil 3D: VBA: Message Box
Point Snap Geometry working … Improve Performance… Buttons
Don’t want to miss out on other great information? Subscribe to this blog or our monthly eNewsletter now!
Learn More ◊ Contact us today ◊ Newsletter ◊
Hi Rod,
Great Tip!!
I’m assuming you can also use the automate coodinate entries for creating a long highway baseline that have distance/bearings for tangent lines and radius/delta for curves? What would be the key-in for changing from tangent to curve and back to tangent? Do you have an example of how the spreadsheet or text document would look like?
Thanks
Guy
Maine Department of Transportation
Hi Guy, I did some checking and couldn’t find an easy solution for working with arcs based on Radius and Delta. If you knew 3 points on the arc you could try the keyin “place arc center constrained;xy=?,?,?;xy=?,?,?;xy=?,?,?” Otherwise I would look at InRoads or Geopak to help you out with scripting out a baseline alignment. Maybe someone else has a better idea.
Bob
how do you pass variable data to the copy parallel keyin command when compiling automated script files in Microstation
Using the method described you will need to add the command key-ins to the first column of your spreadsheet.
To find the correct key-ins for your example select the Move/Copy Parallel tool, then open the Key-in window and enter SET ITEM TOOLSETTINGS
That will show you the available key-ins to modify the settings for the tool. You can add those to your script.
See this tip for more information
https://envisioncad.com/toolsettings-key-ins/