Written by: Bryan Sullivan
Here is a workflow for translating parcels with associated attributes, such as parcel number and parcel area; into shapefiles for use with GIS software such as ArcGIS.
Set a Coordinate System
To set a coordinate system issue the command AeccEditDrawingSettings and choose one in the Units and Zone tab of the Drawing Settings dialog box.

Verify the coordinate system in the drawing by looking in the drawing status bar.

Export Civil 3D Objects to SDF
Civil 3D objects, such as parcels, must be exported to Autodesk Spatial Data Format (SDF) before exporting to shapefile. This converts the parcels into data objects (polylines) with attributes associated to the data objects.
Note: Visible linework must be present in the drawing in order to export a Civil 3D object. Civil 3D objects with a style of “_No Display” will not export.
1. On the Output tab of the ribbon choose Export Civil Objects to SDF.

2. The Export to SDF dialog box will appear. Set the file name and location, confirm that the coordinate system information is correct, and click OK to export all Civil 3D Objects to SDF.
Import SDF File into New Drawing
1. Start a new drawing
2. Type MAPIMPORT in the command line.
3. Choose Files of type: Autodesk SDF (*.sdf), browse to an SDF file, and click OK. The Import dialog box will appear.
4. Set the coordinate system for the new drawing
5. Check box next to Import polygons as closed polylines.
6. Uncheck all except Parcels in the Input Layer column.
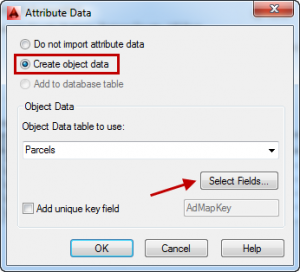
7. Click in the Data column in the Parcels row to set attribute data.

8. Set the radio button for Create object data in the Attribute Data dialog box.
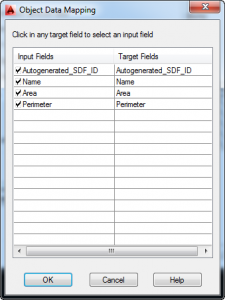
9. Click Select Fields… A list of attributes associated with parcels will appear in the Object Data Mapping dialog box. Select or deselect attributes to import


10. Click OK on all open dialog boxes to import the SDF file. Parcel shapes are inserted into the drawing as polylines with attributes.
Export Polylines with Attributes to a Shapefile
1. Type MAPEXPORT in the command line. This will bring up the Export Location dialog box.
2. Choose Files of type: ESRI Shapefile (*.shp), enter a file name, and Click OK. The Export dialog box will appear.
3. On the Selection tab, select Line as the Object type.
4. Choose either Select all to include all linework in the drawing, or choose Select manually. To select objects manually click the selection button.![]()

5. On the Data tab, click Select Attributes…

6. The Select Attributes dialog will appear. Under Object Data check the attributes to be exported and click OK.

7. Click OK in the Export dialog box and a shapefile will be created, complete with attribute data for use with GIS applications.
