Adding a Superelevation to a bridge deck can be done manually, and even varying the slope is possible. The following steps will address both of these options for creating a Superelevation across the bridge.
Edit Deck Slopes for Superelevation
Constant Superelevation
- Open the file that contains the 3D bridge model file
- Open Explorer
- Drill down to the Deck
- Select the Deck to be edited
- Right-click to Open the Properties
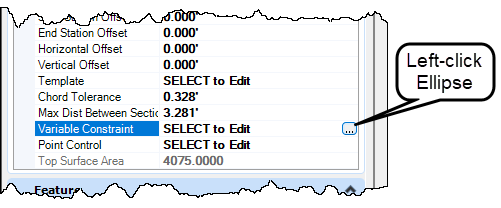
- In the Properties dialog, in the Deck panel, select the Variable Constraint category, left-click on the ellipse to Edit it
- When the SingleDeckTemplateWindow dialog appears, make sure the Variation Tab is selected
- Select LT_Slope_Lane1 Variable
- Check on Active
- Left-click the add variable (green plus sign)
- In the Start Value enter -0.04
- Notice the graphic above in the dialog showing the slope on the left as 0.04 and on the right as 0.02
- In the End Value enter -0.04
- Notice the graphic above in the dialog again
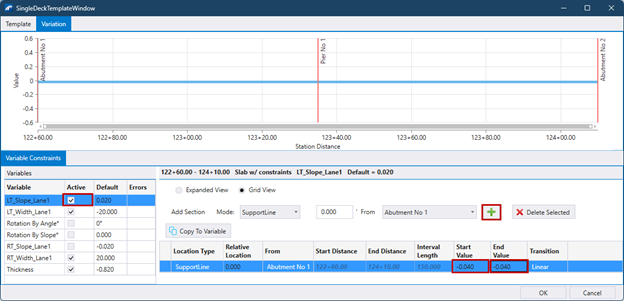
- Select RT_Slope_Lane1 Variable and add a slope variable with the value of -0.04
- Left-click OK to apply the change in the slopes
- It is possible to view the change in the Isometric View
Variable Superelevation
This exercise will show how a Superelevation can be varied across a bridge deck. This is not a designed SE, it is only for demonstration.
- Open the file that contains the 3D bridge model file
- Open Explorer
- Drill down to the deck
- Select the deck to be edited
- Right-click to Open the Properties
- In the Properties dialog, in the Deck panel, select the Variable Constraint category, left-click to Edit it on the ellipse
- When the SingleDeckTemplateWindow dialog appears, make sure the Variation Tab is selected
- Select LT-Slope_lane1 Variable
- Check on Active
- Left-click the add variable (green plus sign)
- In the Start Value enter -0.04
- Notice the graphic above in the dialog showing the slope on the left as 0.04 and on the right as 0.02
- In the End Value enter -0.02
- Notice the graphic above in the dialog again. This is not a designed SE, it is only for demonstration.
- Select RT_Slope_Lane1 Variable and add a slope variable with the value of -0.04 and -0.02 as done in the previous step
- Left-click OK to apply the change in the slopes
- View the change in the Isometric View